Tuesday, March 30, 2010

Rustic sunflower seed loaf


Several days ago I thought it was pretty apt, in view of the arrival of spring (and ergo the foretaste of summer) to make a rustic bread that celebrates that most optimistic of flowers: the sunflower. I wanted to use sunflower seeds, scattered prodigally on top of the loaf and embedded into the crumb. Quite fortuitously I found a largish packet of sunflower kernels for a few bucks at the store.

The recipe I eventually worked with is based on King Arthur Flour's simple rustic loaf  but subbing bread flour for some of the AP. Here's my version

Sponge

1 1/2 cups cool water (I used bottled water)
1 teaspoon instant yeast
1 1/2 cups all-purpose flour
1/2 cup rye flour

Dough

2 tsp salt
1 1/4 cups bread flour
1  cup all-purpose flour
1/2 cup mixed sunflower kernels and poppy seeds

First, I made the sponge around midnight just before bake day. I mixed the sponge ingredients and let it rest a bit more than instructed. In fact I left it alone for nearly 16 hours. No harm done. (Note to self: Use a large bowl for the sponge next time, saves on cleaning).

The next day, I made the dough by stirring down the sponge, and adding the salt and flour.  I turned the mixture out and kneaded it until the dough was smooth and elastic. I kneaded in my seeds and placed the dough in a greased bowl, turning to coat its surface with oil. After this I left it alone inside the warm oven for about 2 hours while I went for a run.

After the dough had doubled I turned the dough out onto a lightly greased baking tray and studded the surface with some of the seeds. Covered and let rise for about 1 hour. About 15 minutes towards the end of the rising time, I preheated the oven to 450°F.

I stuck the bread in the oven (I skipped the slashing-the-surface part) and quickly spritzed some water around to create steam. After 30 minutes in the oven I checked the loaf and it didn't seem to be quite ready so I reduced the temperature to 400 and baked the heck out of it for 15 minutes more.

The loaf was delicious and substantial, though not as heavy as my first rye bread. I plan to tweak my technique next time as the sunflower seeds that I used for decoration just fell off. I might try to spritz the surfaces of the laf with water first, followed by an eggwhite glaze and the seeds.

Mmmm love me some raisins

This is based on a very excellent recipe at The Fresh Loaf, converted to metric and shown using my timetable.


I didn't shape the loaves carefully enough -- I would have liked a more even domed top -- but boy, this was delicious straight from the oven and this morning it made heavenly toast.

The crumb was good, not dense at all. It was quite light but still had good structure.


Cinnamon-maple raisin bread


Makes 3 loaves

680g bread or AP unbleached flour
227g whole wheat flour
150g rolled oats
2.5 cups water
3/8 cups milk
2 tbsp honey
2 tbsp maple syrup
5.5 tbsp vegetable oil (I used extra virgin olive oil as that was al I had)
1 tbsp plus 1/2 tsp salt
1 1/4 tbsp instant yeast
2 tbsp ground cinnamon
2 cups soaked and drained raisins
1 egg white, beaten and with a pinch of salt to help break it down

Timetable:

7:00 pm: Soak the raisins in warm water to which you can, as I did, add orange flavouring (other possibilities include rum, earl grey tea, orange juice). In a large bowl, soak the oats in the 2 1/2 cups water.

7:30: Drain off the raisins. Mix the flours, yeast, salt, and cinnamon. In another container combine the milk, honey, maple syrup and oil. Dump the liquid mixture into the oats, and then dump in the flour mixture. Mix well, until all of the flour is hydrated. Knead by hand for 5-7 minutes, then mix in the drained raisins. Knead until the raisins are distributed throughout the dough.

7:45: Place the dough back into your now-greased large bowl. Spray the top with a little nonstick spray or oil, and cover with a kitchen towel or clingfilm. Allow to rise for 1 hour.

Around 8:45: Remove the dough from the bowl and fold it, degassing it gently as you do. Place the dough on your floured counter, top side down. Fold the dough in thirds, like a letter, gently degassing. Fold in thirds again the other way. Flip the dough over, dust off as much of the raw flour as you can, and place it back into the bowl.

9:00 Cover the bowl and allow the dough to rise in bulk again for another hour.

10:00 Preheat the oven to 450F. Tip dough out of the bowl and degas very gently. Divide the dough in thirds and shape the loaves. Place each shaped loaf into a greased pan. Gently brush each loaf with egg white and sprinkle with some more oats.

Place the loaves in the center rack of the oven. After 5 minutes, reduce the oven temperature to 375. Rotate the loaves 180 degrees after 20 minutes, and bake for another 15 to 25 minutes, until the tops of the loaves are nicely browned, the bottoms of the loaves make a hollow sound when tapped.

Around 11: All done! You really should cool the loaves on a rack. But if you're like me and probably 90 percent of home bakers, you'll have a slice straight from the oven.

Monday, March 29, 2010

In the age of cutesy

I like the power of the direct gaze; no subterfuge, no coyness. All is strength. It says, here I am, in the lines on my face, the levelness of my eyes. Take it or leave it.

Sunday, March 28, 2010

Welcoming the radishes

Two days ago they came out, green, tiny and new. The first shoots from our vegetable garden, along with the asparagus.

Thursday, March 25, 2010

The totally homemade weekday lunch

Tangy potato salad with caramelised onions, bathed by an infusion of 1/4 cup apple cider vinegar, 1/4 cup olive oil, a teaspoonful each of sugar and mustard, salt and pepper.


Paired with a simple roast chicken a la Thomas Keller.


For the husband, a slice of homemade rye bread also.

Wednesday, March 24, 2010

Spring planting


Spring is SO much in the air - and in the light, and in the yard - that H and I have started sowing seeds outdoors, adding topsoil around plants and bushes and browsing for seeds at the local nurseries. We're also considering putting up a new raised bed for more varieties of vegetables. Last year we had astounding tomato and zucchini harvests and pretty decent quantities of onions, summer squashes (aside from the zukes), peas and beans and assorted herbs. The corn failed to thrive, though I still managed to snag a few decent-looking ears here and there. The carrots and a few parsnip seeds never came up.

This year we're expanding our veg empire and have already planted radishes, kale, spinach, Swiss chard (the multicolour variety, as opposed to the lovely all-green leaves I planted last year), fennel, onion, leeks and carrots.

Here are the pots where I sowed carrots, spinach and fennel. 

Below are the raised beds: the circular one is for radishes and fashioned out of an old willow tree. Kale, leeks and onions are planted in the rectangular bed.

We both can't wait for the first seedlings to come up! Each morning we scan the ground for shoots. Nada so far. But I'm sure it will be any day now.

Tuesday, March 23, 2010

Your basic rye bread


So yesterday I baked my first pumpernickel rye bread using a recipe I found at the back of a bag of Rogers rye flour sourced from the nearest Save-on. As a beginning baker, I am ecstatic that the results of my efforts have been decent. Until I know more I will be sticking closely to instructions as written. (That's right, I'm a slave to the recipe for now!)

Below is the Rogers recipe and the bolded text are my comments/revisions. I really appreciated that they added metric measures, because accurate measurements are especially key in bread baking. But I've got to admit I didn't really follow them. I went by cups and tablespoons. So sue me.

Rogers Basic Rye Bread
1/2 cup warm water / 125ml
1 tsp honey / 5ml
1 tbsp yeast / 15ml
- Dissolve yeast and honey in warm water and let stand 10 minutes

2 tbsp honey / 25ml
1/4 cup vegetable oil / 50ml
1 tbsp salt / 15ml
1 tbsp caraway seeds (optional) / 15ml
1 3/4 cups warm water / 425ml
1 tbsp lemon juice / 15ml
3 cups dark rye flour / 750ml
2 1/2 to 3 1/2 cups all purpose flour / 625-875ml

In a large bowl, measure honey, oil, salt, craway seeds, warm water and lemon juice; add yeast mixture and mix well. Add rye flour and beat vigorously by hand or at low speed with electric mixer for 2 minutes. Stir in sufficient all purpose flour to make a soft, workable dough. (I only needed the minimum amount indicated).

Turn dough oout on a lightly floured surface; knead 5 minutes until dough is smooth and elastic. Form dough into a ball and place in greased bowl, turning once to grase the top. Cover and let rise until doubled in bulk, about 1 1/4 hours. (Mine took nearly 2 hours. I let it rest inside the oven with only the pilot light on but a check at the hour mark showed a very modest rise, probably because the room and oven were cold. To speed things along I switched the oven on to its lowest setting for a minute then switched it right off. Sure enough the dough took off beautifully and soon doubled in size).

Punch dough down and form into smooth balls. Cover and let rest 20 minutes. Roll each ball to form aa long, rounded loaf and place on greased baking sheet sprinkled with cornmeal. Using a sharp knife, make 3 or 4 shallow diagonal slashes across the top of each loaf. Let rise until almost double in bulk, about 1/2 hour. Bake in a 375F/190C oven for 40-50 minutes or until done. Remove from baking sheets and cool on wire rack. (I baked the loaves in a 425F oven for the first 15 minutes, then dropped the heat to 350 until they were done. I also spray-misted the loaves and oven walls with water within the first 10 minutes, avoiding the pilot light. And to ensure a nice golden glaze I gave the loaves an eggwhite wash before I put them in the oven).

The dough at various stages:


The finished bread:


Sliced once it was (almost) cool:


Tuesday, March 16, 2010

Bauernbrot

So today I was musing about making some German-type bread since H comes from the German-speaking part of Switzerland and spoke Deutsch as a kid (though he's forgotten most of it). He loves pumpernickle rye breads and every now and then comes home with an impulse-bought loaf (or ten) from the supermarket.

Bauernbrot, which uses half white and half whole wheat flours, some sourdough for taste, and caraway seeds, and undergoes two risings that make it light enough for slicing (I don't really like heavy dense breads myself) came to mind.

I plan to make some in the next few days. Here's hoping it doesn't turn out like this!

Monday, March 15, 2010

The kingdom of bread


The doors to the kingdom have opened and I hear trumpets!

Can you tell I am totally stoked?


I’ve made many muffins and cakes but none have involved yeast. The reason was simple: I dread the prospect of kneading. I tried this last year (granted it was a simple empanada wrapper that turned glue-like and rubbery) and it gave me a phobia.

Lately I decided it was time to get over my fear. It was time to knead. After two days searching many websites and numerous blogs I found a recipe on The Ultimate Student Cookbook that, with a few tweaks of my own, worked like magic. The result was simple, healthy, and delicious. H and I immediately shared the one teeny test bun straight from the oven and slathered it with butter.


We're going through the first loaf even as I type this, and it's nearly midnight. Such is the power of the holy quad: flour plus yeast plus salt plus water.


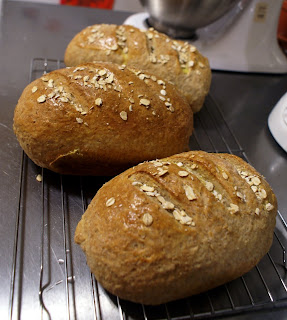
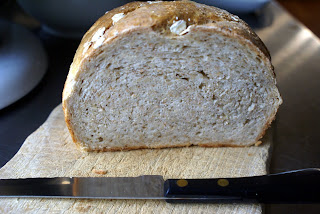
Oatmeal whole-wheat bread

Makes 3 loaves, approx 1.6lbs each.

Ingredients

4 tbsp vegetable oil (I used olive oil)
2 level tbsp dark soft brown or other brown sugar
300g jumbo oats or porridge oats + an extra tbsp for the topping
500g strong whole-wheat flour + 400g all purpose flour
4 tsp salt
2 level tsp quick-acting yeast (I used Fleischmann’s quick rise instant yeast)
500ml warm water
Beaten egg or egg white for glazing

You’ll also need 3 lightly greased 900g loaf tins, preferably non-stick

Heat 500ml water until hot but not boiling, add the oil and sugar and stir until melted. Add the oats, stir and leave to cool while assembling the rest of the ingredients.

In a large bowl, tip in the whole-wheat flour. Sift in the white flour, salt and yeast and mix thoroughly so the salt and yeast are evenly distributed. Make a hollow in the centre, add the oat mixture and half the water, and stir with a wooden spoon. When the mixture begins to come together, scrape the dough off the spoon and bring the mixture together with your hands adding as much extra water as you need to form a dough. (The texture should be slightly sticky but not wet).

Turn the dough onto a board and knead for 10 minutes until it springs back when you press it lightly with your thumb.

Transfer the dough back to the mixing bowl, Cover the bowl loosely with an oiled plastic wrap, oiled foil, or a towel. Let the dough rise in a warm, draft-free location (ideal rise temperatures are between 80°F - 90°F). I stuck the bowl inside my gas oven with the pilot light lit (see note 1).

Once the dough has risen (note 2), knock it back and knead gently a few times. Cut into three equal loaves. I recommend weighing the dough which will make it easy to cut it into the desired sizes. (My dough came to 4.5 lbs and made 3 loaves, which came out differently sized but I blame my beginner-level skills in kneading and shaping).

Shape the loaves so that they will fit into the tin, leaving the join underneath. Recover with the wrap and leave until the dough has doubled in size (about another 30-40 minutes). Stick them back in the warm oven or another warm place.

Turn the oven on to 220°C/425°F about 15 minutes before the dough is due to be ready. (Obviously if you were doing the second rise in the oven, take the loaf pans out first).

Check if the dough is ready (note 3). If it is, brush the tops of the loaves with the beaten egg then sprinkle over the remaining oats. Place the loaves in the oven and bake for 20 minutes then turn the heat down to 190°C/375°F and bake for a further 25 to 30 minutes or until you can insert a skewer or sharp-pointed knife in the bread and it comes out clean. Leave in the pan for 10 minutes then turn out to cool on a wire rack.

Cook’s notes

1. Oven rising - The oven is an ideal place for rising. For an electric oven or a gas oven with the electronic ignition, heat the oven at the lowest setting for one or two minutes, then TURN IT OFF. In other gas ovens, the pilot light will provide enough warmth, so you don't need to turn it on at all. The oven temperature should not exceed 90°F during the rising time. Place a pan of very warm water toward the back of the oven to provide moisture, which keeps the dough soft during rising. Place the covered bowl or pan of dough on the center rack and close the door.

2. “Ripe test” after first rising (in the bowl): Yeast dough is considered "ripe" when it has risen enough - usually doubling in size. The ripe test determines if the dough is ready to be punched down and shaped. To test, gently stick two fingers in the risen dough up to the second knuckle and then take them out. If the indentations remain the dough is "ripe" and ready for punch down. If not, cover and let the dough rise longer. Repeat test.

3. Ripe test after second rising (on baking pan or sheet): Simply touch the side of the dough lightly with your fingertip. If the indentation remains, the loaf is ripe and ready for the oven.

Wednesday, March 10, 2010

Creamy cabbage with smokies


This dish reminds me of childhood. My Mom often made dishes using vegetables to make the meat (chicken, pork, etc) go further. Cabbage sauteed with pork and other veg featured quite often on the dinner table. The funny/sweet thing is, H also loves cabbage dishes - stewed, braised, sauerkraut, coleslaw. We both loved this one, paired with homemade spicy fries.

Ingredients:
1 head cabbage (small), sliced into strips
Half an onion, chopped
3 European-style smoked sausages, chopped up any way you like
Salt and pepper to taste
1 tbsp flour
2 tbsp vegetable oil

Nothing could be simpler. In a large saute pan, saute onions in oil until translucent. Throw in the chopped sausages and stir fry about 5 min. Add cabbage and a pinch of salt. Cover and cook at medium-low heat until cabbage is soft, about 20 min. When cabbage is melty, dissolve flour in a quarter cup of water and add to pan. Finally, season to taste with salt and pepper.

~~~

Cabbage. It's not the most glamorous of vegetables, is it? Fennel is romantic. Asparagus is a cherished symbol of spring. Spinach is fresh looking and zucchini is summer incarnate. But cabbage - ah, done right, it's the sweetest thing.

Monday, March 8, 2010

Bald and bold


Bald eagle sighting today, perched high up on a tree at the far end of our property line. It's the national bird and a symbol of the USA, but it is widely seen in Canada too. I don't have telephoto zoom but given the distance and the scale of the trees, you can tell this guy was HUGE!

Chive and cheese bread

I love bread. I love cheese. I love using herbs freshly picked from our garden. And I like the idea of using #2 and #3 to make #1. But I don't like working with yeast. The thought of spending a few hours proofing the dough and kneading and double rising puts me off a lot of bread recipes. That's why I love quick breads, both the sweet and savoury kind. Still, I've never had much luck making good-tasting savoury quick breads. Until today.


These chive and cheese confections are made much the same way you make biscuits or scones. Baking powder is the sole leavening agent and a single egg provides structure. The flavourings should be assertive.

Chive and cheese bread


Ingredients:
2 cups all-purpose flour
¼ cup butter (57g), cut into cubes
1/2 tsp salt
1 tbsp baking powder
4 oz cheddar or other strong cheese, grated
¼ tsp cayenne pepper
1/2 tsp onion powder
2 tsp chives, chopped
1/2 cup milk
1 large egg

Position rack in the centre of the oven and preheat oven to 400F.

In a large bowl, combine flour, salt and baking powder. Add butter and work it into the flour using your fingers (but don’t overdo it; I’d say work it until there’s just enough flour clinging to the butter pieces and most of the flour is still free and loose)

Add cayenne pepper, onion powder and chives. Stir to combine. Add grated cheese and stir again.

Combine the milk with the egg (which you’ve lightly beaten). Pour this into the flour mixture.

The mixture will be crumbly. The next step is to knead the dough until it comes together. You can do this in the same mixing bowl, or use a floured chopping board or countertop.

Shape the dough into four equal sized rounds (or squares, or one big round loaf, as you please!) and transfer into a baking tray that you’ve lined with parchment or baking paper. Using a sharp knife, cut an X shape into the top of the loaves, about half an inch deep.

Bake for 30 minutes and eat warm with lashings of sweet or salty butter!


Tuesday, March 2, 2010

Double rainbows


Double rainbows, the sun a ball of liquid fire. It was one of the most beautiful sunsets I've ever seen.