Friday, July 31, 2009

The essential fudgy brownie


Better cooks than I have perfected the fudgy brownie and while, as a noted glutenfree blogger recently observed, there's no such thing as a perfect recipe because everybody's tastes differ, there sure are recipes that come very, very close.

All of which is to say that I have found my go-to recipe for fudgy brownies and will not be deviating from this for a long, long time.

Behold, the Army of the Evil Fudgy Brownies. They tempt, they seduce, they beckon to you straight out of the oven. You know, on first sight, that they will be utterly rich, mouthfilling morsels of chocolateness without the irksome light cakey-ness of other brownie recipes. (You can tell which side I'm on in the great Brownie Debate). You know, with utter certainty, that the walnuts will add that counterpoint of crunch and depth. And therefore, faced with such temptation, you succumb. You swoon into submission. Resistance is futile.


***

Fudgy Brownies

This is almost exactly Cindy Mitchell's recipe, except for these minor variations: I didn't use a square baking pan, I used a muffin pan with muffin paper liners, and then added 2 to 3 walnuts per "muffin". The muffin form makes it easy to eat and mercifully un-messy. I wanted the nuts to stick out and the brownies to look spiky, so I added the nuts after all the batter had been poured into the paper liners. I also omitted the vanilla and upped the salt from "a pinch" to a full quarter-teaspoon.

5 oz. (10 Tbs.) unsalted butter, at room temperature
2 oz. unsweetened chocolate
5 oz. bittersweet chocolate
1 cup sugar
2 tsp. vanilla extract
1/4 tsp salt
2 large eggs, at room temperature
1 large egg yolk, at room temperature
3 oz. (2/3 cup) all-purpose flour

Position an oven rack on the middle rung. Heat the oven to 350°F. Butter an 8-inch square pan, line the pan bottom with parchment (or waxed paper), and then butter the parchment.

In a double boiler over simmering water, melt the butter and both chocolates (or microwave for a few minutes, being careful not to burn the chocolates). Remove the pan from the heat; cool slightly. Whisk in the sugar and then the vanilla and salt. The mixture will be somewhat grainy; this is okay. Whisk in the eggs and egg yolk, one at a time, stirring each time until blended. Add the flour, beating until thickened and smooth, 30 to 60 seconds. Pour into the prepared muffin pan. Stud each "muffin" with 2 to 3 walnuts. Bake until a toothpick inserted in the middle comes out with moist crumbs (not wet batter) clinging to it, 35 to 45 min.

Set the pan on a rack until cool enough to handle, around 5 minutes. Remove to a cooling rack and let cool completely (if you can manage to wait that long).

Midsummer blooms


As we move into August I'd say spring to early summer was the best time for garden flowers and they put on a FABULOUS show: daffodils, peonies, irises, begonias, primroses, even the buttercups, geraniums, French lilacs, columbines, all sorts of poppies, Scottish broom, irises, cornflowers etc made a grand parade. Now that summer is well and truly underway and the days are at their hottest, the garden is not as showy as far as flowers are concerned -- but the fruit and vegetables have kicked in, and H and I are happily coping with the masses of produce.

Still, the day lilies are livening up the yard with spiky orange clusters, and many wildflowers continue to bloom in the front yard, in the overhang around the house and out in the back of the house.

The daylilies in the front yard:


There's echinacea:


A few hydrangeas:


A pot of lavender:


And a whole host of others I can't identify:


I love looking at these little wild ones closely. They aren't as showy as the huge, lovely peonies. What they are are micro doses of sunny charm...modest bouquets of midsummer.

Thursday, July 30, 2009

Hot-weather breakfast


Take four eggs and beat them lightly. Season with salt and pepper. Chop up your choice of herbs (mine was parsley and chives from the garden). Slice up a few large mushrooms, any kind. Slice up one leftover hotdog.

Take a frying pan and saute hotdog and mushrooms in a little bit of butter. Set aside. Next, add a small knob of butter and in low-medium heat cook the eggs until semi firm. Sprinkle with the herbs, mushrooms and hotdog and cook on low heat until egg is firm. Sprinkle with Parmesan and take it off heat.


I call this my omelette-pizza cos that's what it looks like. And for a light, easy breakfast in this heat, it can't be beat.


Wednesday, July 29, 2009

Breakfast AND dessert? YES.


For breakfast this morning: a base of blueberries and golden raspberries, banana slices, a handful of crunchy walnuts, a splodge of yogurt and a drizzle of honey. No-cook, no-fuss, and utterly good.

As we were eating, I was surfing the Net for ice cream makers (since I woke up with the idea that maybe I should be trying to make our own Ben & Jerrys) and asked H how much he liked ice cream on a scale of 1 to 10. Ice creams rate a 5 with him, muffins a 7, but the berry breakfast was near the top of the scale! That's what I call having your breakfast and eating your dessert too :-)

Good morning everyone. Stay cool.

Tuesday, July 28, 2009

Vegetable daze (aka Gardens gone wild)


There is NO other word for it! The garden is just BURSTING with produce. The seeds and seedlings H and I planted in early spring have amply repaid our efforts and many times over. And the veg are mostly holding up to this terrific heatwave we've been having in BC, helped by the good watering H gives them every now and then.

We are going to have a crazy crop of tomatoes. I've already been picking the cherry tomatoes and eating them almost straight from the plant, like fruit. (Well, they ARE fruit, n'est-ce pas?)


As you can tell we have plenty of green tomatoes but they sure are taking their time (apart from the cherry tomato which is presenting us with beautiful red globes almost daily now). Only one of the beef toms has reddish fruit but the texture is slightly suspect; will have to look it up on Google later:


The zucchini are huge as you will see below. Today's harvest was a particularly "interesting" shape. Unfortunately I don't have a picture as I chopped it up for a curry lunch.


We've already picked one well-sized summer squash, though I'm not yet sure what to do with it...


H's mega investment in blueberry trees has borne fruit, literally. Here's our harvest (pardon the goofy expression, I am quite infatuated with these berries). Bowls of blueberries (lovely and tart) and the yellow raspberries that are milder than the red ones:


We are breathlessly waiting for the plums to ripen. Elsewhere in BC plums are already ready but these are young trees (H says) so they need more time.


The corn are shooting up like no one's business, though it will be a while yet before there's something to eat.


One disappointment has been the strawberries which the slugs have relentlessly mowed down, so that the baby berries don't even reach their equivalent of puberty. I took this shot of two little survivors two days ago but I suspect they're now gone too and made some slug really happy:


The onions are flopping over (the leaves I mean) in a clear sign that they're ready to be harvested, but we're letting them just sit and dry out, only pulling the odd one out if I need it for my cooking.


The carrots were stunted and I pulled them out a few weeks ago, replacing them with parsnips which should be good for a winter harvest. Since early June we've had plenty of kale, spinach and chard. I've started a new crop, so H and I will be eating healthfully and well, right through autumn!

Ahh autumn...I look out the door and the heat is a physical thing that I push against if I am to get anything done. Actually it's also time to start thinking about harvesting the coriander seeds and lavender buds...More on that in another post.

Happy summer days/daze!

White hot


I am WILTING. I know I'm a tropical girl but 30 to 35 degree heatwaves, in non-airconditioned rooms, will have me melting into a puddle in no time at all.

H phoned me from work today and wondered why I'm not coping too well with the heat, since presumably the Philippines and Hong Kong, where I've spent most of my life until I arrived in Canada last April, have hotter summertime temps. The answer is simple: there was always airconditioning!

A/C is the answer. Will checkout Walmart or Zeller's and see if they have some sort of A/C sale on. Heck, at this rate I'll even settle for Standard's "Bagyo" type of electric fan that I sometimes saw in Manila. Standard distributors, are you reading this??

Meanwhile, the vegetables are still thriving. The garden runneth over! And so is my sweat. Oh excuse me, "glow". *
--
* As they say, horses sweat, men perspire and ladies merely glow!

Photo courtesy

Sunday, July 19, 2009

Oh cassava!


I started making this on Thursday at around 11pm and had my first slice of the wonderfully creamy pudding a scant minute after I took it out of the oven. I was a little bit careless and the coco milk topping got burnt in places -- but no matter, I just simply peeled off the burnt sugar spots. Underneath it all was glorious, sweet, creamy decadence.


Pinoy-style cassava cake
Serves 12

Ingredients:
3/4 cup granulated sugar
4 oz melted butter or margarine
Around 4 cups frozen cassava, thawed (you can use fresh, of course!)
1 large egg
2 cans coconut milk
1 can condensed milk
grated cheese

Preheat oven to 350 F.

In a bowl mix sugar, egg, melted butter, and 1 can of coconut milk until smooth, then add the cassava. Pour mixture into a rectangular baking pan (I used a 13x9 pan) which has been lined with banana leaves or aluminum foil. Bake in the centre rack of the oven for 30 to 40 minutes until top is firm.

In a pan over low heat, combine the remaining can of coconut milk and condensed milk, stirring and cooking until thickened. Pour on top of the cassava cake and broil for 5 to 10 minutes (I used the BROIL setting in my oven and stuck the cake pan on the lower shelf).

When the topping is golden brown, take the cake out, sprinkle it with grated cheese, and return to the oven and broil on the top shelf for around 5 minutes more, or until the cheese has melted.

Let cool and eat warm or cold. It's wonderful either way. This keeps in the fridge for about a week.

Saturday, July 18, 2009

Post midnight


I like to do my cooking late at night, which is why it is 1 am on Saturday and I am waiting for my cassava cake and oatmeal muffins to cool before I can join H, who is currently sleeping peacefully (with the occasional snortle!) and resting up before the weekend...

I think this week has been pretty productive. I turned in one freelance assignment, did a half day of volunteer work, read a lot. Most importantly, after much hemming and hawing I finally restarted my yoga practice, in the sense of actually attending a class again after a hiatus of about four months. I heard about the yoga studio just a stone's throw from where I do volunteer work on Thursdays, and so right after work on Thursday I went in and paid for a session before I could chicken out.

It was a lovely workout. The old bones are creaky but they didn't shame me too much at class. It was a mixed level class and while I have lost quite a bit of my flexibility muscle memory kicked in and made it possible for me to keep up with the instructions. Also, Bonsor Recreation Centre in Burnaby is so central as it's near Metrotown mall (which gets most of the shopping traffic in this part of town), and it's popular; the place was jammed with people -- I'd say about 70 percent of Asian descent -- that day H and I visited. But the yoga/Pilates studio is in the back of the building and completely quiet and peaceful, with huge windows affording glimpses of tree lined alleys.

As I lay quietly in the final few minutes of the Hatha session the sun started streaming in and warmed my limbs. It was like a benediction. I remembered the views of the Fraser River as H and I were driving past earlier in the day. Clouds, skies, mountains, water. My husband beside me. What a beautiful new life.

Thursday, July 16, 2009

Double chocolate muffins with walnuts


Joy of Cooking has been my go-to cookbook since 2004. It has truly been a joy. I remember I bought it when I was in Manila on a one-and-a half year posting from my then-job in Hong Kong. (And it is sweet to be "posted" back home). I rented a little apartment near my workplace and with it came a compact range oven. So, of course, having wanted a proper oven of my own for so long, I started cooking up a storm, and I haven't stopped.

I think I've maybe tried around 50 of the recipes in the book, and the other day I found my thoughts turning to the chocolate muffin recipe. I made it once or twice before and wanted to revisit it, this time adding some walnuts.

And, as before, Joy delivered. These muffins were chocolaty, sweet without being too sweet, and having 2 large walnuts embedded in each piece added just the right counterpoint of crunch to offset the chocolate.

Double chocolate muffins
Recipe adapted from The Joy of Cooking

Preheat oven to 350 F. Line a 12-muffin pan with muffin cups.

Melt and let cool 2 ounces of unsweetened chocolate.

Whisk together 1 3/4 cups flour, 1 tsp baking soda, 1/4 tsp salt.

Combine in another bowl 1 cup buttermilk (or yogurt) and 1 tsp vanilla.

In large bowl, beat until creamy 8 tablespoons unsalted butter. Gradually add 1 cup packed light brown sugar and beat on high speed, around 5 minutes.

Beat in 1 large egg.

Beat in melted chocolate just until blended. Add flour mixture in 3 parts, alternating with milk mixture in 2 parts, beating on low speed until smooth.

Stir in 1 cup chocolate chips.

Divide batter among muffin cups. Insert two whole walnuts in each cup. Bake until toothpick inserted into muffin comes out clean, or 25-30 minutes. Let cool to room temperature before serving.


Wednesday, July 15, 2009

Baked salmon with walnut pesto sauce


I love salmon because of all the good stuff in it -- it is packed with Omgea-3 fatty acids, it's high in protein and a single serving delivers your daily requirement of Vit. D. But the flavour can be quite, err, assertive. In this recipe, I called in the pesto troops to temper that "salmon-ness."

Why walnut pesto? I didn't happen to have pine nuts handy. But it turned out well, even if I do say so myself :-)

Baked salmon with walnut pesto
Serves two.

Make the pesto. Throw in a handful of walnuts, 1/4 cup of extra virgin olive oil and four cloves of chopped garlic into a food processor and pulse until it is blended but still chunky. Add two cups of fresh, washed basil leaves in batches until the mixture is smooth and thick. Blend in one-fourth cup grated Parmesan cheese. Add a little brown sugar and a squeeze of lemon juice -- the sugar balances the flavours and the lemon juice keeps the basil from turning brown upon exposure to air.

Meanwhile, wash one large salmon fillet and pat dry. Season with salt and pepper. Grease your baking dish (I used a shallow, oven-safe ceramic fish plate) with some olive oil. Lay the fish on top and pour the pesto over. Bake in a preheated 350 F oven around 20 minutes.

Sunday, July 12, 2009

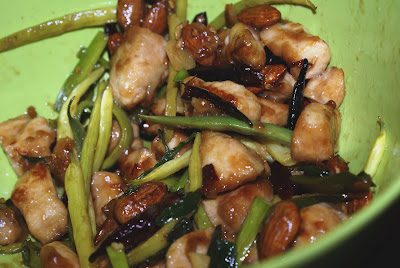
Soyed vermicelli with spicy almond chicken


An easy dish that comes together without much fuss. For the chicken I followed the basic recipe for Sichuan kung pao chicken, but made a few substitutions based on what I had on hand. For peanuts, I used almonds; for sesame oil, grapeseed oil; and for cornstarch or water chestnut flour (which makes a lighter crust than cornstarch) I subbed tapioca flour.

Ingredients:
•2 boneless chicken breasts, about 6 ounces each, cubed
•8 red chillies, halved
•Bunch of green onions, chopped
•About a dozen almonds
•3 cloves garlic, minced
•5 - 7 slices of fresh ginger
•Oil for frying, about 2 tablespoons

Marinade:
•1 tablespoon soy sauce
•1 teaspoon Chinese rice wine (or dry sherry)
•2 teaspoons cold water
•2 teaspoons tapioca flour
•2 teaspoons grapeseed oil (but a more flavoured oil like sesame oil is BEST)

Sauce:
•1 tablespoon dark soy sauce
•2 teaspoons light soy sauce
•1 tablespoon black or red rice vinegar, or red wine vinegar
•1 tablespoon chicken broth or water

Vermicelli
•2 50g packages of bean thread vermicelli
•2 tablespoons soy sauce
•1 tablesooon brown sugar

Preparation
1. Combine the marinade ingredients and add the chicken pieces. Let sit for half an hour.
2. Heat oil and stir fry chicken pieces until almost done. Set aside.
3. Stir fry chillies and almonds. Add ginger and garlic and stir for a few minutes.
4. Add the chicken and sauce to the pan and cook for 5 minutes.
5. Turn off heat and add sliced green onions and give it a final stir.

To make the noodle, simply boil about 100g of bean thread vermicelli until al dente. Drain off the water, keeping the noodles in the pot, and add about 2 tbsp of soy sauce and a teaspoon of brown sugar. Stir thoroughly, dump into a bowl, add as much of the chicken as you like. Enjoy.


PS At the last minute, I also decided to throw in some young, tender yellow beans we'd just picked from the garden. Extra green goodness!

Friday, July 10, 2009

Biko at last!


I've had a few kitchen flops and I don't mind talking about them. When I was first learning to cook I remember roasting a whole fish for hours in the oven hoping it would get brown. Only much later on I realised I should have used the broiler instead to get a crisp golden skin. I could also have covered the fish for a while and then uncovered it in the last stages. And added a bit of oil instead of letting the fish essentially poach in its own juices.

I also remember making a truly soggy eggplant/veggie lasagna that I forced my poor sisters to take home. I'm sure there were other disasters that my friends and family will remember :-)

More recently I tried my hand at making cassava cake (or cassava bibingka) the Pinoy way. It was tough and chewy and a total waste of ingredients. But I know now each flop is a great learning opportunity. That cassava disaster told me to never use ground cassava flour (tapioca flour in the supermarket) if I want good results. Grated cassava is the ONLY way to go.

So when I decided to try making biko with latik topping the other day it was with some trepidation. I love Filipino style desserts so much -- hello ginataan! hello suman sa lihiya, kalamay at latik, bibingka at puto bumbong! -- but have not really made many of them. I guess when I was living in Hong Kong I was spoiled. I knew that the next visit home was never more than two or three months away and failing that, there were always sources of Pinoy food at Worldwide House in Central. But living in Canada makes access to my food heritage a bit more difficult since I don't drive and public transit in our area is limited.

To satisfy my biko craving I did some research and after some tinkering came up with this recipe. It worked out well -- so well in fact, that my husband ate 3/4 of a pie-plate-ful of the dessert in 48 hours. He very generously left a few forkfuls for me, isn't he sweet ;-)


Here's the recipe. It makes enough to fill a 9-inch pie plate with about 3 cups left over. If I had a rectangular 11' baking dish I would have used that. You can use any pan you like. The biko should fill the pan around 1 inch to 1.5 inch deep for best presentation...most people prefer a thicker topping instead of a thicker rice-cake bed.

Biko at latik
(Rice cake with caramel topping)

For the biko
•2 cups cooked malagkit (sticky rice) (I used the rice cooker)
•3/4 c. brown sugar
•Around 3 cups freshly squeezed, or canned, coconut milk
•3 - 4 tablespoons of butter
•optional - strips of sweetened langka (jackfruit, which you can also buy prepared)

Topping:
•1 15 oz can condensed milk
•3/4 cup rich coconut milk
•2 tablespoons flour or tapioca flour, to thicken

While still hot, combine the cooked sticky rice with the brown sugar and coconut milk. Add butter and optional langka strips and stir well. Transfer to the baking dish and bake in a preheated 300 F oven for 15 minutes.

Meanwhile make the topping by combining the topping ingredients in a heavy-duty saucepan and stiring constantly over low heat until the mixture thickens.

Pour topping over the rice mixture and return to the oven, baking until the topping turns golden brown, around 15 minutes.

This is wonderful hot or cold -- and especially, I'm thinking, with an icy glass of Coke!

Quinoa muffins


Today I made quinoa muffins since we had some leftover quinoa in the cupboard and I wanted to ty Martha Stewart's quinoa muffin recipe, with some variations of my own.

Verdict: 2.5 out of 5 stars. If you like quinoa, you might even give them a 3. These were healthy and moist and held together well. With the added apricots and almonds they also looked lovely. But I found the quinoa taste a little off-putting. Frankly I'll stick to using it as a substitute for rice, couscous or potatoes for meals from now on.

Oatmeal-quinoa muffins with fruit and nuts
Makes 12

• 1 cup uncooked quinoa, rinsed
• 1/4 cup grapeseed or any neutral tasting vegetable oil
• 1 cup all-purpose flour
• ½ cup wheat germ
• ½ cup quick cooking oats (not instant)
• 3/4 cup packed dark-brown sugar
• 2 teaspoons baking powder
• 1 teaspoon salt
• 3/4 cup currants or raisins
• 1 dozen whole almonds
• Dried apricots, chopped to make 1 cup

• 3/4 cup whole milk
• 1 large egg
• 2 teaspoons pure vanilla extract
• 1 teaspoon cinnamon

Directions
1. Preheat oven to 350 degrees. In a small saucepan, bring quinoa and 1 cup water to a boil. Reduce to a simmer; cover, and cook until water has been absorbed and quinoa is tender, around 10 minutes. Let cool.
2. Meanwhile brush a standard 12-cup muffin pan with the vegetable oil. You can also use melted butter. Dust with flour and tap out excess. Or just use a non-stick pan, and use paper muffin cups.
3. In a medium bowl, whisk together flour, wheat germ, oatmeal, sugar, baking powder, salt, currants, chopped apricots and 2 cups of the cooked quinoa.
4. In a smaller bowl, whisk together oil, milk, egg, vanilla and cinnamon. Add liquid mixture to flour mixture, and stir just until combined. Divide batter among prepared muffin cups. Stick two almonds into each muffin.
5. Bake 25 minutes or until toothpick inserted in the center of a muffin comes out clean. Allow to cool in the pan for 5 minutes and then transfer to a wire rack to cool completely.
6. Store in an airtight container up to 5 days.

Tuesday, July 7, 2009

Fabulous four


Early prayer to Santa

We are interrupting our regular programming in order that I can send an early note to the North Pole: Dear Santa, please give me any of these for Christmas. Any. Please. Or better still, ALL of 'em.

The Shoe Lady

All photos from here

Wednesday, July 1, 2009

Happy birthday, Canada!


One hundred and forty two years old, wow! Hot and sunny day, which saw H and me quite busy. We drove over Golden Ears bridge for the first time since it opened, looked at apartments in Surrey and New Westminster, had breakfast with H's brother, and visited my sister and her son in Vancouver. Random images from the day: lovely vintage cars on the highway, huge murals on the walls of the North Surrey Rec complex, a few rough characters on the streets in Surrey, and a ground floor apartment that won my heart but that unfortunately had too little privacy. My sister's new place, which was both cool and bright at the same time in the summer heat that baked the city. Oh, and the HUGE Canadian flag in a car dealer lot in Surrey.


Back at home, the garden was growing fast and rampant, as it has been for weeks, and the mosquitoes were out in fearsome force.