The doors to the kingdom have opened and I hear trumpets!
Can you tell I am totally stoked?
I’ve made many muffins and cakes but none have involved yeast. The reason was simple: I dread the prospect of kneading. I tried this last year (granted it was a simple empanada wrapper that turned glue-like and rubbery) and it gave me a phobia.
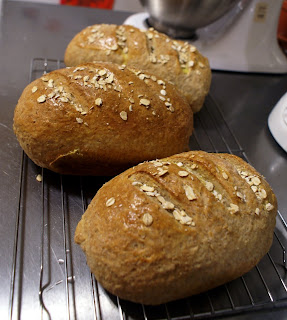
Lately I decided it was time to get over my fear. It was time to knead. After two days searching many websites and numerous blogs I found a recipe on The Ultimate Student Cookbook that, with a few tweaks of my own, worked like magic. The result was simple, healthy, and delicious. H and I immediately shared the one teeny test bun straight from the oven and slathered it with butter.

We're going through the first loaf even as I type this, and it's nearly midnight. Such is the power of the holy quad: flour plus yeast plus salt plus water.

Oatmeal whole-wheat bread
Makes 3 loaves, approx 1.6lbs each.
Ingredients
4 tbsp vegetable oil (I used olive oil)
2 level tbsp dark soft brown or other brown sugar
300g jumbo oats or porridge oats + an extra tbsp for the topping
500g strong whole-wheat flour + 400g all purpose flour
4 tsp salt
2 level tsp quick-acting yeast (I used Fleischmann’s quick rise instant yeast)
500ml warm water
Beaten egg or egg white for glazing
You’ll also need 3 lightly greased 900g loaf tins, preferably non-stick
Heat 500ml water until hot but not boiling, add the oil and sugar and stir until melted. Add the oats, stir and leave to cool while assembling the rest of the ingredients.
In a large bowl, tip in the whole-wheat flour. Sift in the white flour, salt and yeast and mix thoroughly so the salt and yeast are evenly distributed. Make a hollow in the centre, add the oat mixture and half the water, and stir with a wooden spoon. When the mixture begins to come together, scrape the dough off the spoon and bring the mixture together with your hands adding as much extra water as you need to form a dough. (The texture should be slightly sticky but not wet).
Turn the dough onto a board and knead for 10 minutes until it springs back when you press it lightly with your thumb.
Transfer the dough back to the mixing bowl, Cover the bowl loosely with an oiled plastic wrap, oiled foil, or a towel. Let the dough rise in a warm, draft-free location (ideal rise temperatures are between 80°F - 90°F). I stuck the bowl inside my gas oven with the pilot light lit (see note 1).
Once the dough has risen (note 2), knock it back and knead gently a few times. Cut into three equal loaves. I recommend weighing the dough which will make it easy to cut it into the desired sizes. (My dough came to 4.5 lbs and made 3 loaves, which came out differently sized but I blame my beginner-level skills in kneading and shaping).
Shape the loaves so that they will fit into the tin, leaving the join underneath. Recover with the wrap and leave until the dough has doubled in size (about another 30-40 minutes). Stick them back in the warm oven or another warm place.
Turn the oven on to 220°C/425°F about 15 minutes before the dough is due to be ready. (Obviously if you were doing the second rise in the oven, take the loaf pans out first).
Check if the dough is ready (note 3). If it is, brush the tops of the loaves with the beaten egg then sprinkle over the remaining oats. Place the loaves in the oven and bake for 20 minutes then turn the heat down to 190°C/375°F and bake for a further 25 to 30 minutes or until you can insert a skewer or sharp-pointed knife in the bread and it comes out clean. Leave in the pan for 10 minutes then turn out to cool on a wire rack.
Cook’s notes
1. Oven rising - The oven is an ideal place for rising. For an electric oven or a gas oven with the electronic ignition, heat the oven at the lowest setting for one or two minutes, then TURN IT OFF. In other gas ovens, the pilot light will provide enough warmth, so you don't need to turn it on at all. The oven temperature should not exceed 90°F during the rising time. Place a pan of very warm water toward the back of the oven to provide moisture, which keeps the dough soft during rising. Place the covered bowl or pan of dough on the center rack and close the door.
2. “Ripe test” after first rising (in the bowl): Yeast dough is considered "ripe" when it has risen enough - usually doubling in size. The ripe test determines if the dough is ready to be punched down and shaped. To test, gently stick two fingers in the risen dough up to the second knuckle and then take them out. If the indentations remain the dough is "ripe" and ready for punch down. If not, cover and let the dough rise longer. Repeat test.
3. Ripe test after second rising (on baking pan or sheet): Simply touch the side of the dough lightly with your fingertip. If the indentation remains, the loaf is ripe and ready for the oven.

No comments:
Post a Comment